What is OpenStack?
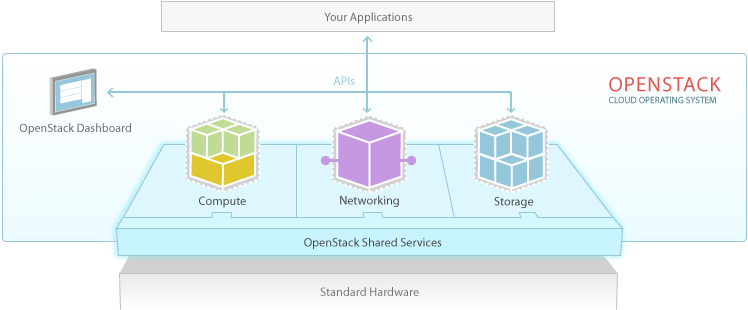
OpenStack is a cloud operating system that controls large pools of compute, storage, and networking resources throughout a data center. All of the above components are managed through a dashboard which gives administrators control while empowering their users to provision resources through a web interface. It is an open source cloud computing platform for public and private clouds.
OpenStack Components
• Compute Components
- API Server (nova-api)
- Message Queue (rabbit-mq server)
- Compute Workers (nova-compute)
- Network Controller (nova-network)
- Volume Worker (nova-volume)
- Scheduler (nova-scheduler)
- Image Service (glance)
• Dashboard
- User Interface (horizon)
• Service Object Storage
- Storage Infrastructure (swift)
• Security and Users
- Identity Service (keystone)
- Database (mysql)
	[Neutron]  		[Cinder]
    	    | virtual        block/storage
    	    | network    _________/
    	    |  _________/
   	   //  disk images            disk files
   	[Nova] ==========>  [Glance] ==========> [Swift]
   	  ------------------------------------------------
   	                        |^| ~auth
   	                    [KeyStone]

   	 [src : http://justfewtuts.blogspot.in/2013/04/beginners-guide-to-openstack-basics.html]
What is DevStack?
DevStack - A documented shell script to build complete OpenStack development environments. It is a script which will install all the required dependencies and deploy a complete openstack development environment. It can be refered as OpenStack in a Box.
Install DevStack
####** Getting Started ** - Install DevStack 1. Install Virtual box
- We need a virtual matchine with minimum 2GB RAM. We can either install ubuntu ova or use vagrant to do it for us.
- Install vagrant
- mkdir devstack_vagrant
- vagrant box add precise64 http://files.vagrantup.com/precise64.box
- vagrant init precise64 – this will add and boot up a ubuntu 12.04 box.
- edit Vagrantfile
- Increase ram size
config.vm.provider :virtualbox do |vb|

      #   # Don't boot with headless mode

      #   vb.gui = true

      #

      #   # Use VBoxManage to customize the VM. For example to change memory:

        vb.customize ["modifyvm", :id, "--memory", "2048"]

end - vagrant up && vagrant ssh This will bring up the vm and opens a shell into the server image.
-
update apt-get and install dependencies
sudo apt-get update && sudo apt-get -y install git vim-gtk libxml2-dev libxslt1-dev libpq-dev python-pip libsqlite3-dev && sudo apt-get -y build-dep python-mysqldb && sudo pip install git-review tox git clone https://github.com/openstack-dev/devstack.git– clone the latest devstack code to devstack foldergit clone https://github.com/openstack-dev/devstack.git -b stable/icehouse devstack/– clone the stable icehouse code to devstack directory- cd devstack - this directory will contain code to start/stop openstack .
####Sample Interfaces file
#####/etc/network/interfaces
# This file describes the network interfaces available on your system
# and how to activate them. For more information, see interfaces(5).

# The loopback network interface
auto lo
iface lo inet loopback

# The primary network interface
auto eth0
iface eth0 inet dhcp


# we create directly br100 and attach it to eth1
#auto br100
#iface br100 inet static
#address 192.168.56.1
#netmask 255.255.255.0
#network 192.168.56.0
#broadcast 192.168.56.255
#    bridge_ports eth1
#    bridge_stp off
#    bridge_maxwait 0
#    bridge_fd 0


auto eth1
iface eth1 inet static
address 192.168.56.1
netmask 255.255.255.0
network 192.168.56.0
broadcast 192.168.56.255
#####/etc/resolv.conf
# Dynamic resolv.conf(5) file for glibc resolver(3) generated by resolvconf(8)
#     DO NOT EDIT THIS FILE BY HAND -- YOUR CHANGES WILL BE OVERWRITTEN
nameserver 192.168.254.1
nameserver 8.8.8.8
nameserver 192.168.2.1
Exploring DevStack
DevStack directory contains various scripts and configuration files. lets take them one by one
-
stack.sh
Running this script will
a. Pull OpenStack code from all of it’s important projects’ repositories and put them in/opt/stackdirectory.(We can update the contents of this directory).
b. Installs all the dependencies these OpenStack projects have – both in the form of Ubuntu packages, and also the Python pip repositories.
c. Starts all the OpenStack services with a default configuration. -
unstack.sh
Stops all the services started by stack.sh. All the code changes will remain intact. -
rejoin-stack.sh
This script rejoins an existing screen, or re-creates a screen session from a previous run of stack.sh. NOTE: DevStack environment doesn’t persist across reboots! So you need to bring back up the DevStack environment manually everytime you reboot .
Best way to reboot is: first executeunstack.shto bring down the current running DevStack instance. Then reboot, and when your machine comes up again, runrejoin_stack.sh. - run_test.sh
- clean.sh
- exercise.sh
localrc is a file where the local configuration are kept. Devstack use this file while running stack.sh to identify the service to run and plugins to enabled. It also store the password for various services.
Sample Localrc file
####localrc
 ADMIN_PASSWORD=password
DATABASE_PASSWORD=password
RABBIT_PASSWORD=password
SERVICE_PASSWORD=password
SERVICE_TOKEN=tokentoken

#Neutron
disable_service n-net
enable_service q-svc
enable_service q-agt
enable_service q-dhcp
enable_service q-l3
enable_service q-meta
enable_service q-metering

#enable_service q-lbaas
#enable_service q-fwaas
#enable_service q-vpn

SCREEN_LOGDIR=$DEST/logs/screen
LOGFILE=/opt/stack/logs/stack.sh.log
VERBOSE=True

# if we set offline=true , as specifies it will not check anything over the Internet, and will set up DevStack using all the packages and code residing in out machine
# OFFLINE=True

# If we set RECLONE=yes, this will get the latest code into the repository
# RECLONE=yes

Q_PLUGIN=ml2
ENABLE_TENANT_VLANS=True
ML2_VLAN_RANGES=mynetwork:100:200
#Q_ML2_PLUGIN_MECHANISM_DRIVERS=anuta

#ENABLE_TENANT_VLANS=True
#TENANT_VLAN_RANGE=1:1999
#PHYSICAL_NETWORK=eth1
#OVS_PHYSICAL_BRIDGE=br-eth1

FLAT_INTERFACE=eth1
PUBLIC_INTERFACE=eth1
HOST_IP=192.168.56.1
FLOATING_RANGE=192.168.56.128/28
NOTE: stack.sh will see if the git repositories of the OpenStack projects are present in /opt/stack/ directory. If they are, it will not fetch any latest code into them from Github. But if any of the directory (say, nova), is absent, it will pull latest code into the newly created nova directory inside /opt/stack. Use RECLONE=yes if latest code is needed.